2D Water Reflections
Table of Contents
This article is a rewrite of my original Feb 2016 article.
One major goal for Verdant Skies was to take a genre dominated by orthographic sprites and bring it a hand-drawn look, enhanced with modern shader effects."
Goals of this Reflective Water
Part of achieving that was adding good looking water. We had a few requirements:
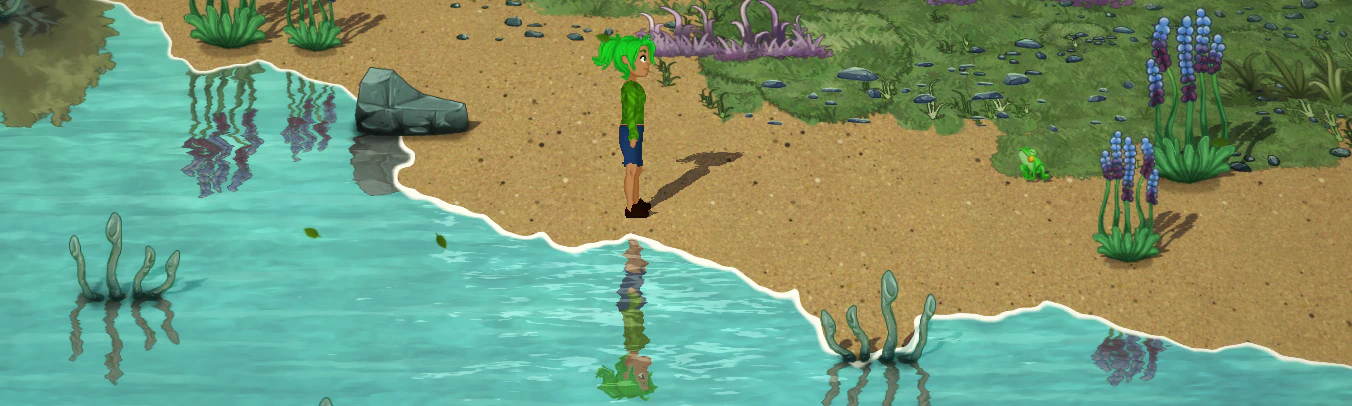
- Reflect upright objects, like people and trees.
- Don’t reflect objects laying flat on the ground, like cobblestone paths.
- Animate the warbling reflections.
- Apply some specular effects from surface crests.
- Animate the shoreline in and out.
- Assemble the water surface piecewise, but it must have no seams.
- Don’t cast shadows on water, don’t worry about things underwater, thus no refraction.
Overall, performance is quite high for this method, but you can easily toggle the effect off by skipping the renders to the RT and leaving those blank. With a little more work you could remove the samples from the water shader, but I find that’s probably not necessary to avoid the vast majority of the cost of the effect.
Drawing our RenderTextures
Setting up Rendering Layers
We do want to minimize the number of full screen draws required in the game, especially for devices that are going to be fillrate limited. However, we do need to draw a few buffers: one for shadows, and one for reflections. We begin by marking objects appropriately with Unity layers as casting shadows, reflections, or both. Each item in Verdant Skies has a very specific point where it touches the ground - we found we needed to set these manually, since items often have rounded or indistinct bottom edges. Verdant Skies has a perspective camera, and this approach does get you perspective-correct reflections.
In the editor, that looks like this:

Rendering each one
Then in our Camera script’s PreRender method, we call this method:
private RenderTexture RenderReflections(Camera c){
	var rt = GetRenderTexture(c, reflectionResolution);
	effectCamera.CopyFrom(c);
	effectCamera.targetTexture = rt;
	effectCamera.backgroundColor = Color.clear;
	effectCamera.cullingMask = reflectionLayers;
	var m = Matrix4x4.identity;

	// And here, we modify the matrix to flip each object we render upside down.
	// because the reflections are mirrored over the point they touch the ground.
	m.SetColumn(2, new Vector4(0, 0, -1, 0));
	effectCamera.worldToCameraMatrix = c.worldToCameraMatrix*m;

	effectCamera.Render();
	effectCamera.targetTexture = null;
	return rt;
}
This draws our reflections into a provided RenderTexture. Then later, when it’s time to draw the water, we can sample from this reflection texture.
If you’re wondering how we achieved the perspective effect, or what we’re doing with our worldToCameraMatrix, check out our Adding some perspective to your Unity 2D game
article.
So let’s step through all the RenderTextures we are drawing and what’s in each of them. I’ll skip the shadow render texture and focus on the reflection effects for now.


The Water Shader
Okay, the last piece of the puzzle is using the water depth map and the reflections to draw some good looking water. We can do all of that in one pass by drawing our water sprites with a custom shader. Here’s what we want to achieve with the shader:
- Draw everything in worldspace, so multiple water sprites are seamless.
- Sample a nice normal map for ripples.
- Use the normals for a specular shine on the surface, based on where the sun would be, if it was a real light source.
- Sample our water depth mask for masking the water.
- Use the gradient on the water depth for a shoreline effect (with foam).
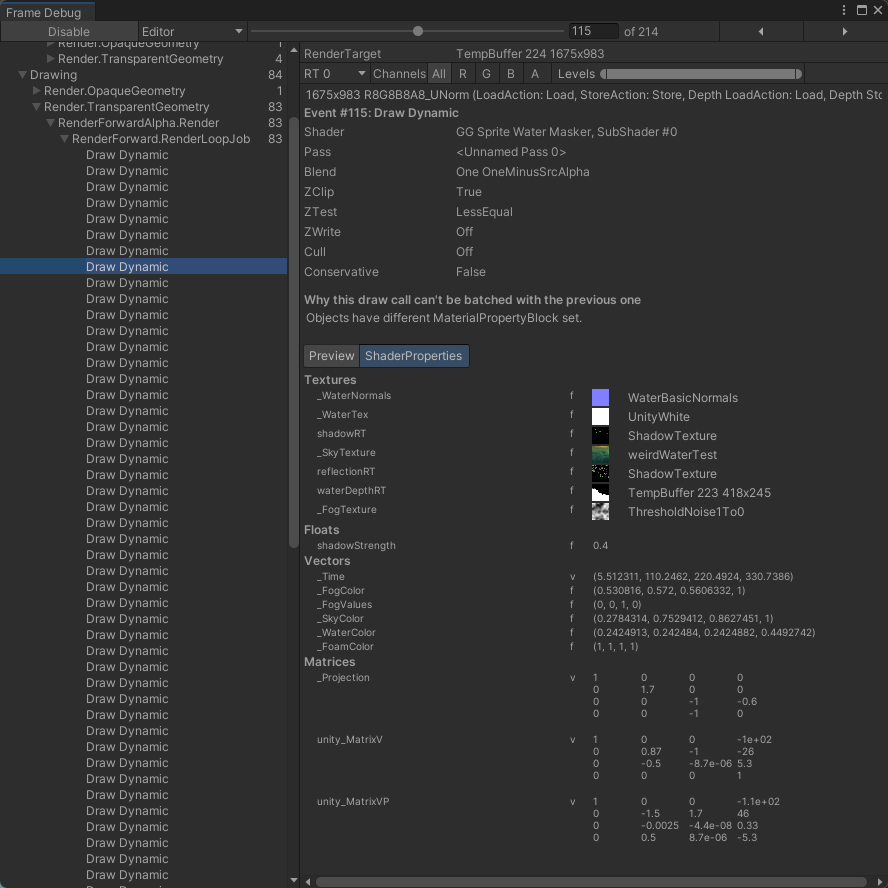
This is how I put the shader together. I visualize each step by returning early with the result of each step.
Drawing the animated water normals
First, we draw the animated water normals. We take a pretty common approach of sampling the texture twice at different UVs, and combining them. The UVs are calculated in the vertex shader, and animate over time, that’s how we create the motion of the water. We start our water color with a color set in the shader as _WaterColor.
v2f vert(appdata_t IN) {
	...
		float2 normals = world * float2(0.1, 0.5);
		OUT.normalsTexCoord1 = normals + float2(0.1*_Time[0],  0.5*_Time[0]);
		OUT.normalsTexCoord2 = normals + float2(0.2*_Time[0], -1.0*_Time[0]);
	...
}

float4 frag(v2f IN) : SV_Target {
	float4 color = _WaterColor;
	color.a = 1.0;

	float screenSpaceDistortion = 0.04;
	float3 waterReflectionNormal = 0.35*normalize(
		UnpackNormal(tex2D(_WaterNormals, IN.normalsTexCoord1*0.1)) +
		0.5*UnpackNormal(tex2D(_WaterNormals, IN.normalsTexCoord2*0.3))
	);
		return float4(0.5*waterReflectionNormal + 0.5, 1);
	...
}

Specular shine
Next, we create a specular shine on the surface of the water, and line it up with where an overhead sun would be.
// sin(15 degrees), cos(15 degrees)
float3 fakeEyeVector = float3((IN.ssTexCoord.xy/IN.ssTexCoord.w * 2.0 - 1.0) * 0.8, 0) + float3(0, -0.258, -0.98);
fakeEyeVector = normalize(fakeEyeVector);

float3 ref = reflect(fakeEyeVector, normalize(waterReflectionNormal.xzy*0.5) );
float specCos = max(0.0, -dot(ref, normalize(float3(0.0, -0.258, 0.98))));
float spec = smoothstep(0.6, 0.9, pow(specCos, 40.0)) * 0.3;
return float4(spec.rrr, 1);
Drawing the reflections
Next up is drawing reflections. In this step we do a few things: We start scaling down the distortion of the water reflections, then use that to sample the sky texture. That’s because the water is mostly reflecting the sky, and is generally pretty bright.
You may want to adjust the sky color based on the time of day or other atmospheric conditions. It’s a good way to make water feel different in different areas also.
Then we sample the reflection texture and use its alpha to draw it on top of the sky color. Right now this is pretty blown out from all the additive blending, but we can adjust that later.
float4 reflectionUV = IN.ssTexCoord;
reflectionUV.xy += screenSpaceDistortion*waterReflectionNormal.xy*IN.ssTexCoord.w;

float4 reflection = tex2Dproj(_SkyTexture, UNITY_PROJ_COORD(reflectionUV));
reflection += _SkyColor;
reflection = Composite(reflection, tex2Dproj(reflectionRT, UNITY_PROJ_COORD(reflectionUV)));
color.rgb += reflection;
return color;

// utility function for premultipled alpha.
float4 Composite(float4 under, float4 over){
	return (1.0 - over.a)*under + over;
}
Combine the effects.
Now for a few simple tweaks to the above. We add in the specular highlight, which creates the bright sun-reflections. Then we ramp down the reflection color evenly. We’re using the alpha of _WaterColor simply as a way to ramp down the strength of the overall reflection, rather than a transparency value.
float4 reflection = tex2Dproj(_SkyTexture, UNITY_PROJ_COORD(reflectionUV));
reflection += _SkyColor;
reflection = Composite(reflection, tex2Dproj(reflectionRT, UNITY_PROJ_COORD(reflectionUV)));
reflection += spec;
reflection *= _WaterColor.a;
color.rgb += reflection;
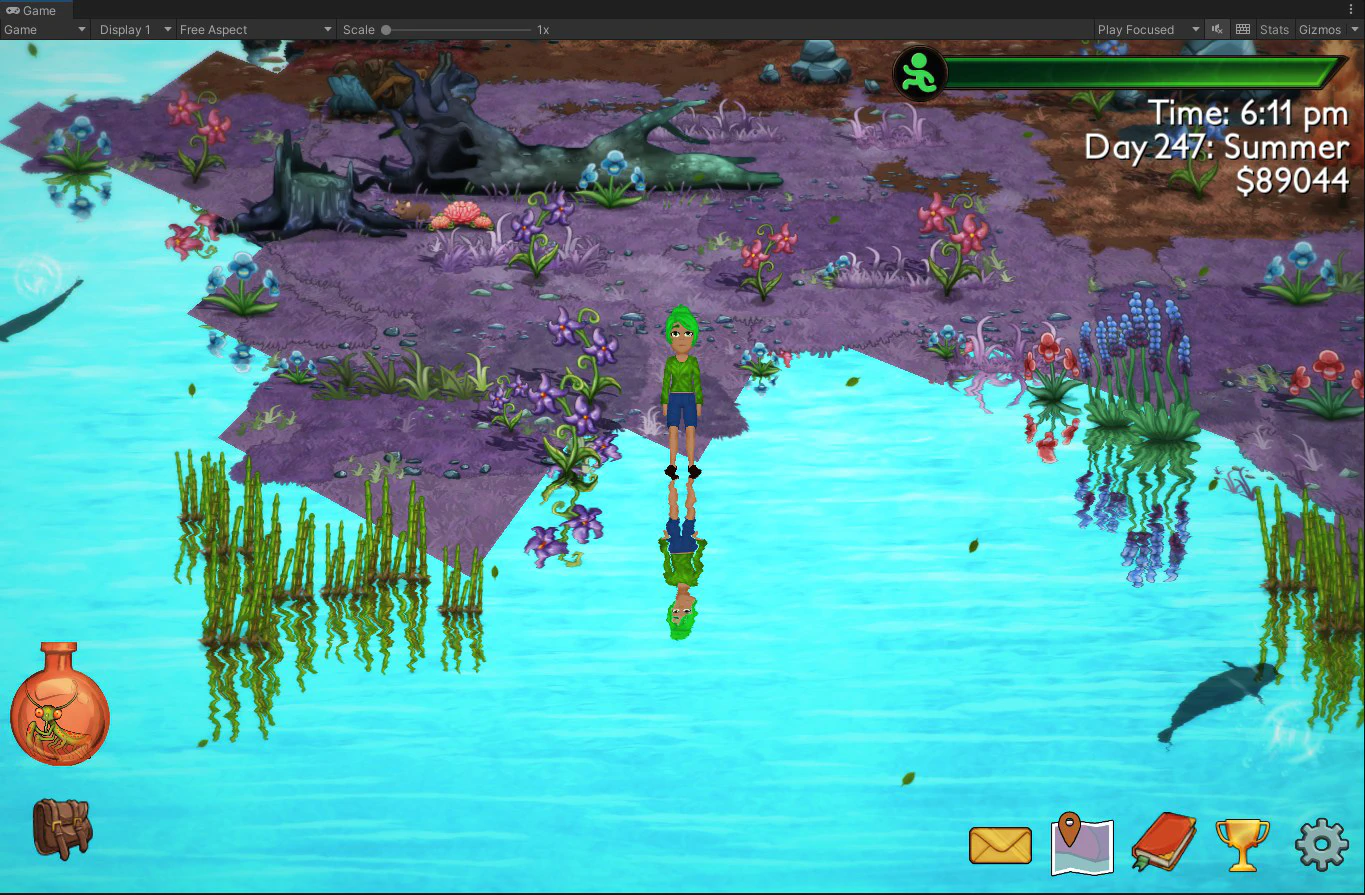
The water depth texture
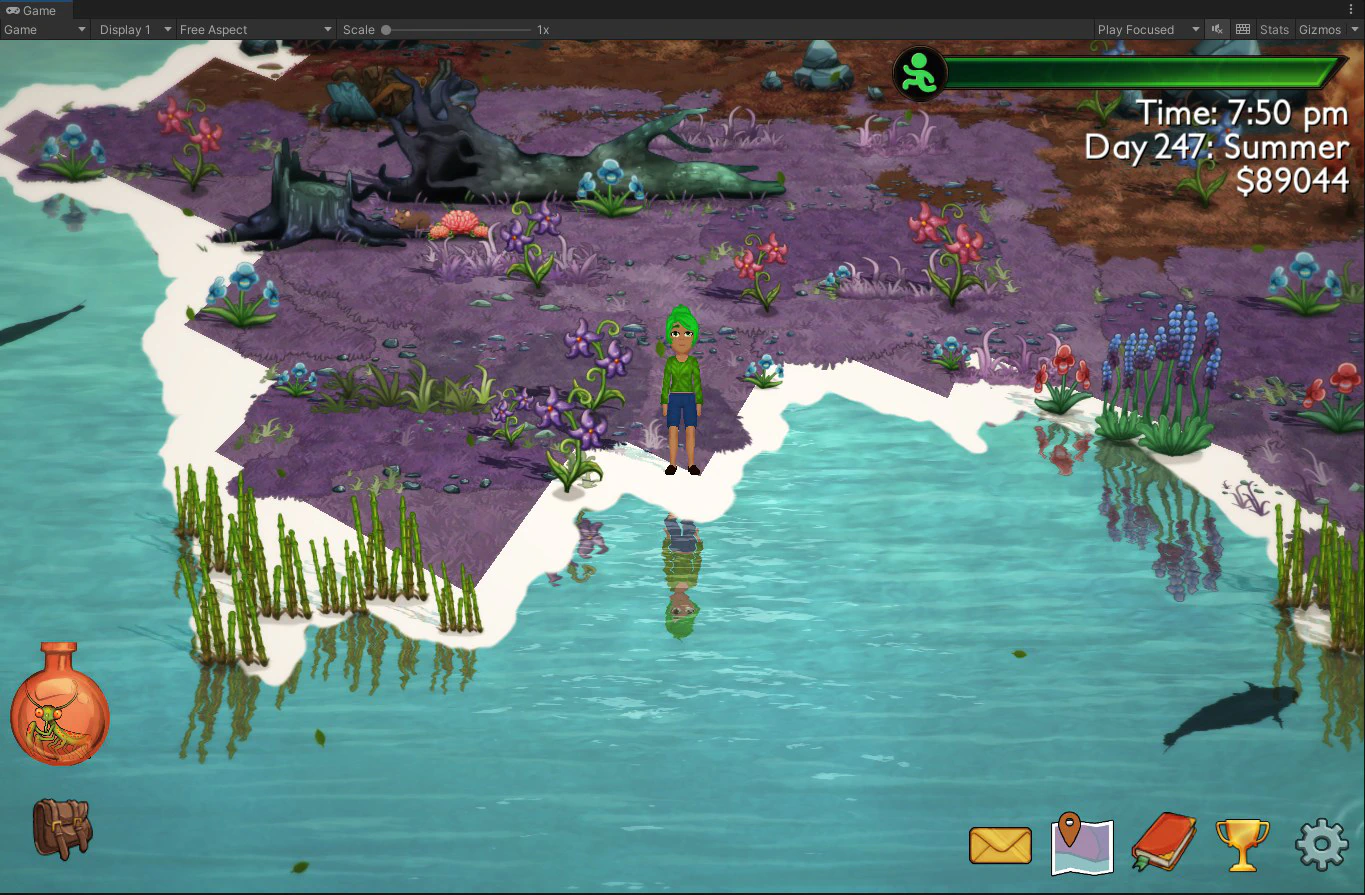
So far, we’ve been drawing our water to quads that have been hand-placed throughout the game world- you can note the square edges in the above images. We want to seamlessly smooth them out, and also draw some cool edge effects.
Here’s a visualization of just the water depth render texture we created above.
float depth = tex2Dproj(waterDepthRT, UNITY_PROJ_COORD(IN.ssTexCoord)).r;
float ddDepth = fwidth(depth);
return float4(depth.rrr, 1.0);
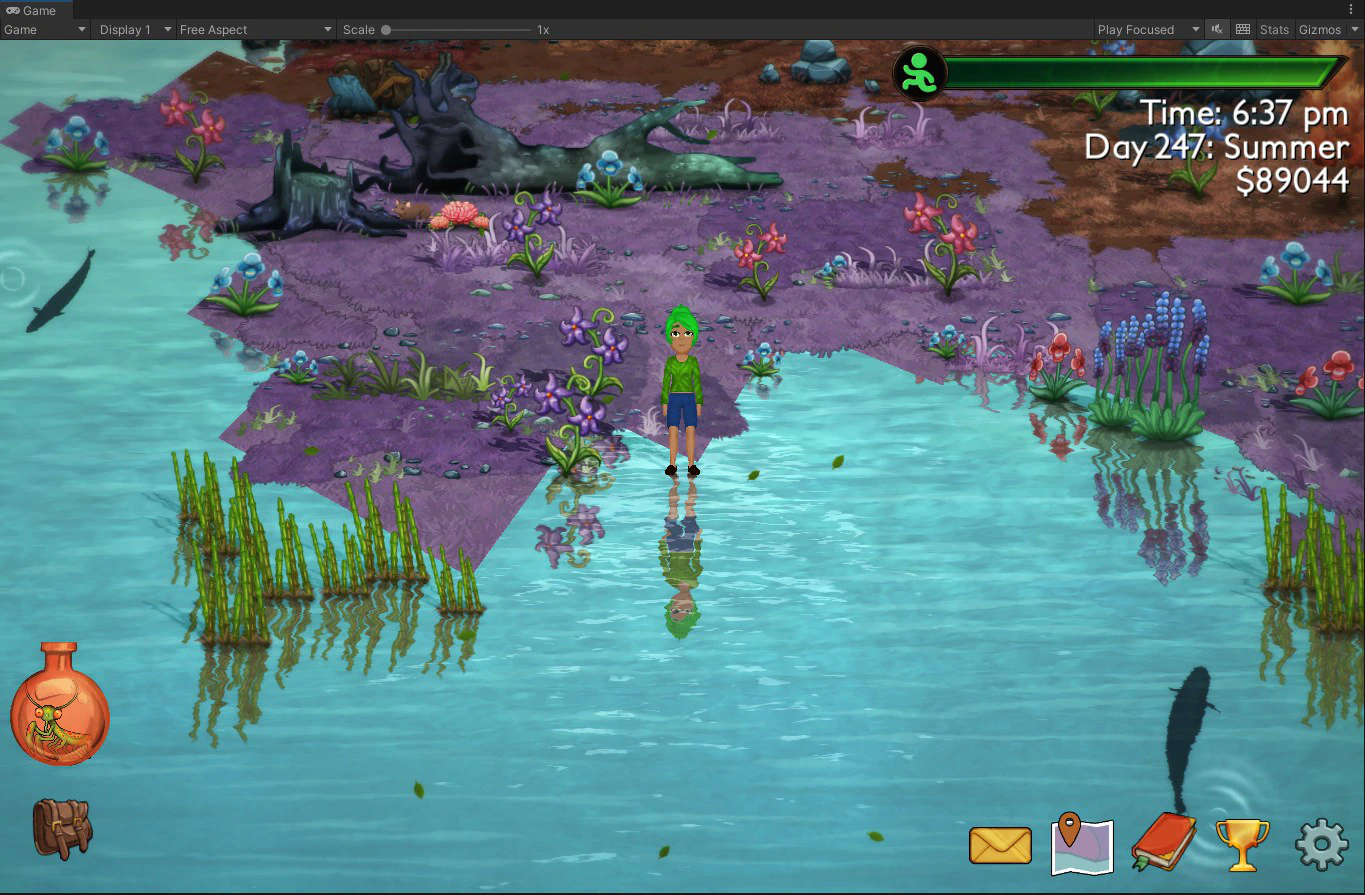
Draw the shore foam
We can use this depth information to draw an animated foam. Here we want to animate the shoreline sweeping from one side of the screen to the other (along the (0.2, 0.7) axis ). This gives a rolling wave feeling that is relaxing and better than pulsing the whole world together.
The values in lerp and smoothstep control the width of the foam effect, based on the value of depth texture shown above.
float shorePhase = dot(IN.worldSpaceTexCoord0, float2(0.2, 0.7));
float shoreWaves = 0.5*(sin(shorePhase) - 0.25*sin(2.0*shorePhase)) + 0.5;
float foamDepth = lerp(0.6, 0.95, shoreWaves);

float foamMask = smoothstep(foamDepth, foamDepth - 0.2, depth);
return _FoamColor*foamMask;
This is pretty good, but we haven’t masked off the edge of the water yet.
(At this point, you could experiment with textured foam. We played with it a bit for Verdant Skies, but the clean white gradient seemed best in this situation.)
Final Water Shader
The last step is to use the same shoreWaves, lerped to a different range, to create the mask:
float maskDepth = lerp(0.1, 0.75, shoreWaves);
float mask = smoothstep(maskDepth - ddDepth, maskDepth, depth);
color *= mask;

// Optionally darken the wet bits of the shore.
//color.a = max(color.a, 0.1*smoothstep(0.05, 0.15, depth));

return color;
Applying the mask to all channels (rgba) will multiply the alpha down to zero for most of the texture, and give us a smooth faded edge.

This article about 2D Water Reflections was written by Andy Korth. Special thanks to Scott Lembcke for his shader expertise.